Products
Solutions
Resources
9977 N 90th Street, Suite 250 Scottsdale, AZ 85258 | 1-800-637-7496
© 2024 InEight, Inc. All Rights Reserved | Privacy Statement | Terms of Service | Cookie Policy | Do not sell/share my information

An InEight Contract payment form is the form used to communicate with the Accounts Payable team, to ensure that invoices are paid. The payment form allows the Contract Manager to identify the work period represented by the invoice and to which line items the invoice should be applied.
As invoices are received at the jobsite, you can attach them to your payment form and allocate how much of the invoice will go towards your contract line items. As the contract manager, you can then submit the payment form for approval. Once the payment details are reviewed to validate the charges are correct and approved according to the project’s workflow assignments, the payment form will directly sync to your ERP (Accounts Payable) system for accounts payable to process. The ERP system will then send back an APAY number for reference on your payment form, along with the status of the invoice in the ERP system.
The following diagram illustrates the typical workflow for processing payments between InEight Contract and your ERP system.
Payment Workflow – InEight Contract and ERP

In a proxy ERP environment, the payment form is used to track line items for an invoice. Responses, such as status, are autogenerated.
The payment form is initiated at the project level, routed to your Business Services team for approval, and then submitted to Accounts Payable. A goods receipt or service confirmation must be completed (if required) before the Accounts Payable team will approve the pay form.
The following steps walk you through how to add a new payment form to your contract.
You can add a payment form when all invoices are received, and you want a standardized form to submit for approval.
On the Contracts register, select a contract.
Select the Payment forms tab, and then click the Add payment form icon.
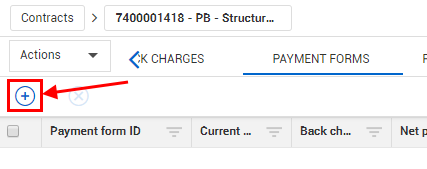
The Payment form details page opens.
Enter payment form information.
Click Save.
If you leave the Payment form details page without saving, the details you added are discarded.
The default payment form automatically downloads as the cover letter.
| Field/Section | Function | |
|---|---|---|
|
1 |
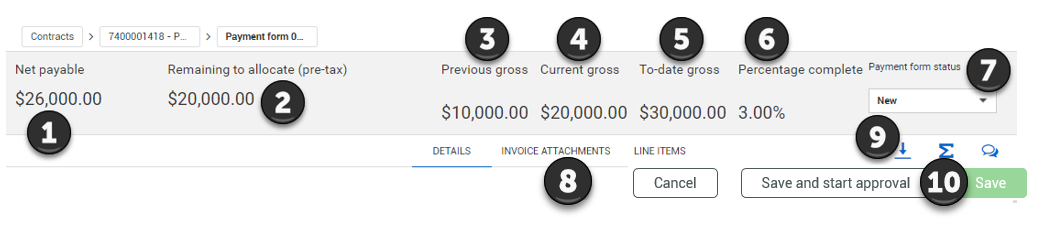
Net payable |
The total amount you are paying to the vendor towards the invoices on this payment form. |
|
2 |
Remaining to allocate (pre-tax) |
The total amount of this payment form’s invoices that are not yet allocated to contract line items. The value of this field must be zero +/- 0.00999 to start workflow, submit, publish, or execute the payment form. The +/- 0.00999 accounts for differences in decimal precision. |
|
3 |
Previous gross |
The total amount from the invoices of all payment forms submitted before the one you are currently on. |
|
4 |
Current gross |
The sum of the invoices attached to the payment form you are on. |
|
5 |
To-date gross |
The total of all invoices on all this contract’s payment forms. This is the sum of your Previous gross and To-date gross amounts. |
|
6 |
Percentage complete |
The percentage that the To-date gross is of your total contract amount (contract Current value). |
|
7 |
Payment form status |
Indicates if the payment form is new, in review, or submitted. |
|
8 |
Tabs |
The payment form is organized into three tabs: Details, Invoice Attachments, and Line Items. |
|
9 |
Download payment form as PDF |
Provides a PDF summary of the payment form, including line items, invoices attached, back charges, and approvers. This summary becomes the cover sheet for Accounts Payable when the form is submitted. |
|
10 |
Cancel, Save and start approval and Save Buttons |
These buttons allow you to cancel, save and begin approval or save the payment form. |
| Field/Section | Function | |
|---|---|---|
| 1 | Tabs | Tabs that let you add invoice attachments, line items and supporting documents to payment forms. |
| 2 | Toolbars |
Tools that let you do the following:
|
| 2 | Actions menu | Lets you generate a payment form document. |
|
3 |
Payment form details |
Where you can input or review the payment form’s basic information, including: description, work completed dates, progress estimate number and billing period, and comments. |
|
4 |
Summary |
Summarizes the total gross amount of the invoices attached to the payment form, less retention and back charges, resulting in the Net amount payable this request, which is the amount you will pay to the vendor. The Progress estimate number and Billing period fields in invoices that are associated to a payment form are manually entered by the user in the payment form. If the information is different from the values from the ERP system, Contract updates the fields with what was sent from the ERP system. |
|
5 |
Back charges |
Allows you to apply back charges from your contract’s Back Charges tab to the payment form, to short-pay the invoice according to the back charge amounts. |

When the Progress estimate number and Progress estimate billing period fields are required for the payment form, you can still save the form. The fields are required for submittal and workflow. When the status of the payment form is New, a yellow warning icon shows next to the Progress estimate number and Progress estimate billing period fields to remind you that the fields are required for approval and submission.
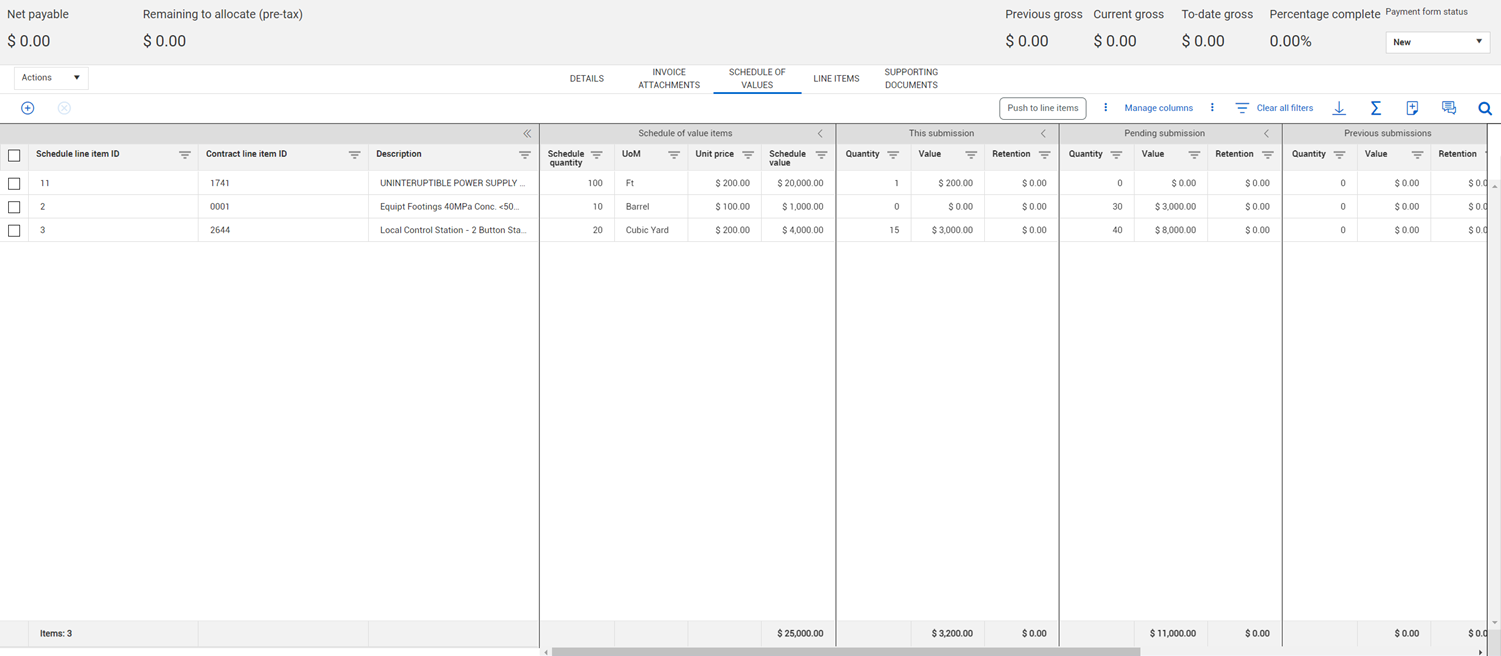
The Schedule of values tab contains schedule of value items from the contract-level Schedule of values page that you can use to build a payment form. Using a schedule of values to populate a payment form gives you the flexibility to create a payment form based on the values claimed in a specific period. For example, you could use the schedule of values to track the values used in a month. You can then push the values to the Payment form Line Items tab, so you pay against the line items.
The payment form Schedule of values tab format is similar to the contract Schedule of values tab. It contains the following sections:
| Section | Description |
|---|---|
| This submission | The values used in this payment form. |
| Pending submission | The values used in previous payment forms that are not in Submitted status. |
| Previous submissions | The values used in previous submissions that have been submitted. |
| Current total | The sum of values in the This submission and Previous submissions columns. |
| Remaining | The Schedule quantity column in the Schedule of Values items section minus the current total. |
See "Schedule of values tab" for more information about the schedule of values.
Add a schedule item to the payment form schedule of values to use in creating a payment form.
You can add schedule items that have already been added to the contract-level schedule of values.
From the Payment form Schedule of values page, click the Add icon. The Add schedule item dialog box opens with a list of schedule of value items from the Contract schedule of values, including the value remaining and the percent complete.
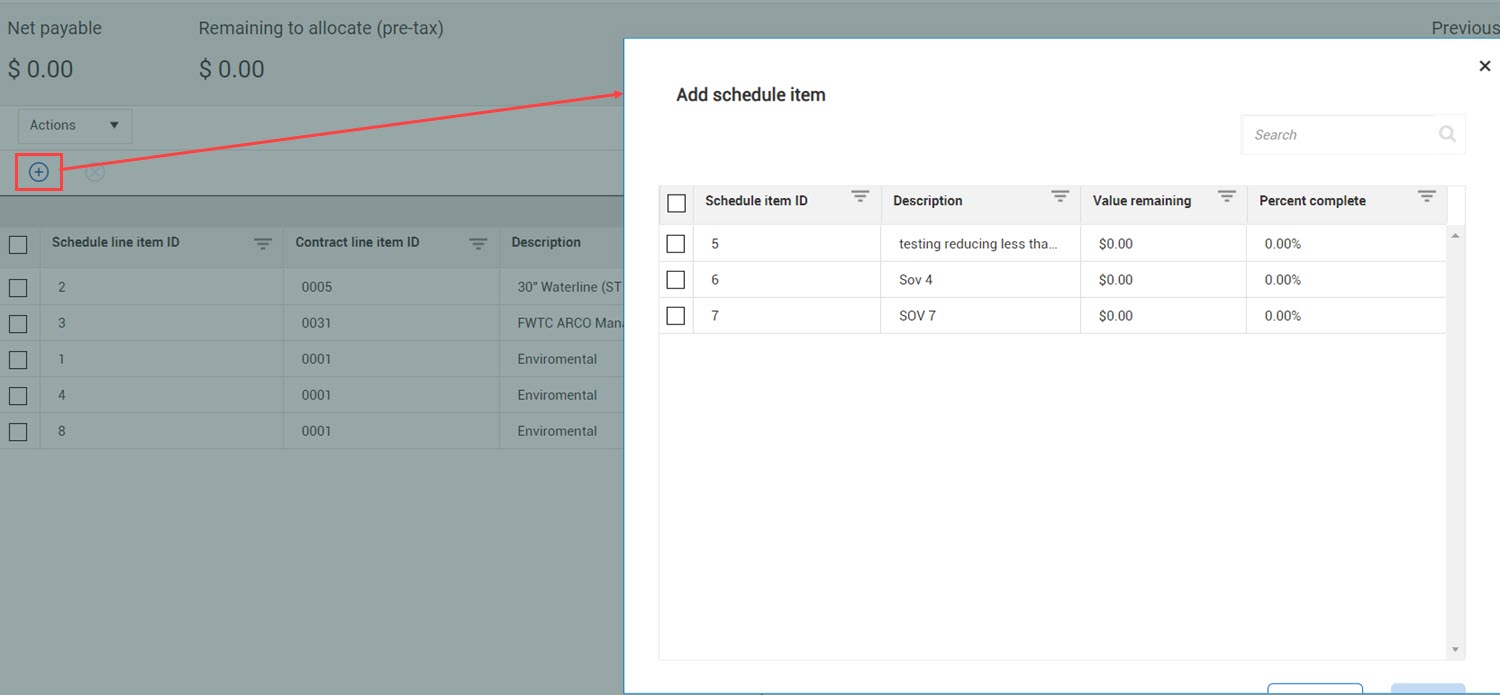
Select one or more items, and then click Add. The items are added to the schedule.
Update the Quantity or Value columns in the This submission section. When you update the Quantity column, the value in the Value column is automatically adjusted, and vice versa.
You can push the schedule of value items to the Line items tab. From the Line items tab, you can also pull the items from the schedule of values.
You must push the schedule items to the Line items tab, so they can be included in a payment form.
Considerations: The Push to line items button is enabled if any of the schedule items have a Contract line item ID. When the Contract line item ID is blank for all items, the Push to line items button is disabled, and you cannot push items to the line items. The contract must be published to push schedule items to the Line items tab.
From the Payment form Schedule of values page, click Push to line items. A warning message indicates that the push updates the Line Items tab with values from the schedule items.
Click Yes to continue. All schedule items are pushed to the line items. Any value or line item that was added to the Line Items tab is removed.
Contract pushes only the line items that are associated to the Contract schedule of values and calculates the line item values. On the Line items page, the total values are shown in the Net price column in the This submission section. If there are multiple schedule items tied to the line item, Contract adds them together to populate the Net price column.
To follow along, select Contract > contracts > Payments forms tab and select a form which you just completed.
The Previous gross, Current gross, and To-date gross amounts displayed in the payment form header help you keep track of how much you have been invoiced.
Previous gross represents any invoices already submitted on previous payment forms. When you fill out your first payment form for the contract, your Previous gross will be $0.00 since no previous payment forms are submitted.

Your Current Gross is the total amount of the invoices you’ve added to your current payment form.

Once you’ve submitted the first payment form, when you add a second payment form to the contract, the Current gross from your first payment form becomes the Previous gross amount.

The Current gross ($20,000.00) is the total of the invoices attached to your current payment form, and the To-date gross amount is the total of all invoices on all your payment forms to date.

Additional Information
9977 N 90th Street, Suite 250 Scottsdale, AZ 85258 | 1-800-637-7496
© 2024 InEight, Inc. All Rights Reserved | Privacy Statement | Terms of Service | Cookie Policy | Do not sell/share my information